You bought an Anthurium for its glossy red flowers, but now you’re staring at small, green blooms that look nothing like the pictures. The edges are turning brown, the flowers won’t open properly, and you’re wondering if you got a dud plant.
This happens more often than you’d think. Anthuriums are sold at their peak bloom in nurseries, but once they settle into your home, they often struggle. The lighting changes, the humidity drops, and suddenly those vibrant red spathes turn pale or stay stubbornly green.
Here’s what you’ll learn: how to get bigger, redder blooms through proper feeding, how to handle those wild aerial roots without harming your plant, the right way to repot without stopping the flowering cycle, and why your light setup might be doing more harm than good. Plus, I’ll show you exactly how to fix those crispy brown edges before they ruin the whole spathe.
I’m Darcey Wren, and I’ve been growing and writing about indoor flowering houseplants for years. My first Anthurium was a gift that quickly taught me these plants don’t thrive on neglect. After watching mine produce increasingly smaller, greener blooms, I started tracking what actually worked—testing different fertilizers, light positions, and potting methods. What I share here comes from managing multiple Anthuriums through their bloom cycles and learning which advice actually produces results.
Why Anthurium Flowers Stay Green Instead of Red
The spathe (the heart-shaped “petal” everyone calls a flower) gets its color from pigments that only develop under specific conditions. When conditions aren’t right, the plant conserves energy by producing chlorophyll-heavy green spathes instead of the anthocyanin-rich red ones.
Light quality matters more than most people realize. I had an Anthurium sitting in what seemed like bright light—a south-facing window with sheer curtains. The spathes came out pale pink at best. When I moved it three feet to the side where it got more indirect morning light but less afternoon intensity, the next bloom cycle produced deeper reds.
Temperature fluctuations disrupt pigment production. Anthuriums need consistent warmth—between 65-80°F. If your plant sits near an AC vent or drafty window, the spathes often emerge pale or stay green. I learned this after noticing my kitchen Anthurium (which sat near the refrigerator’s cold air exhaust) produced consistently lighter blooms than the one in my bedroom.
Nutrient imbalances show up quickly in flower color. Too much nitrogen pushes leaf growth at the expense of blooms. Not enough phosphorus and potassium means the plant can’t build the compounds needed for red pigmentation. Your feeding schedule directly controls what colors appear.
| Condition | Effect on Spathe Color | Timeline to See Change |
|---|---|---|
| Low light intensity | Pale pink or white spathes | 2-3 bloom cycles |
| Inconsistent temperature | Green or mottled coloring | 1-2 bloom cycles |
| High nitrogen fertilizer | Green spathes, excessive leaves | 1 bloom cycle |
| Low phosphorus/potassium | Small, pale, or green flowers | 1-2 bloom cycles |
| Poor water quality (hard water) | Dull, brownish-red color | Gradual over months |
The Right Feeding Schedule for Bigger, Redder Blooms
Standard houseplant fertilizer won’t cut it for Anthuriums. These plants need specific ratios to produce quality spathes.
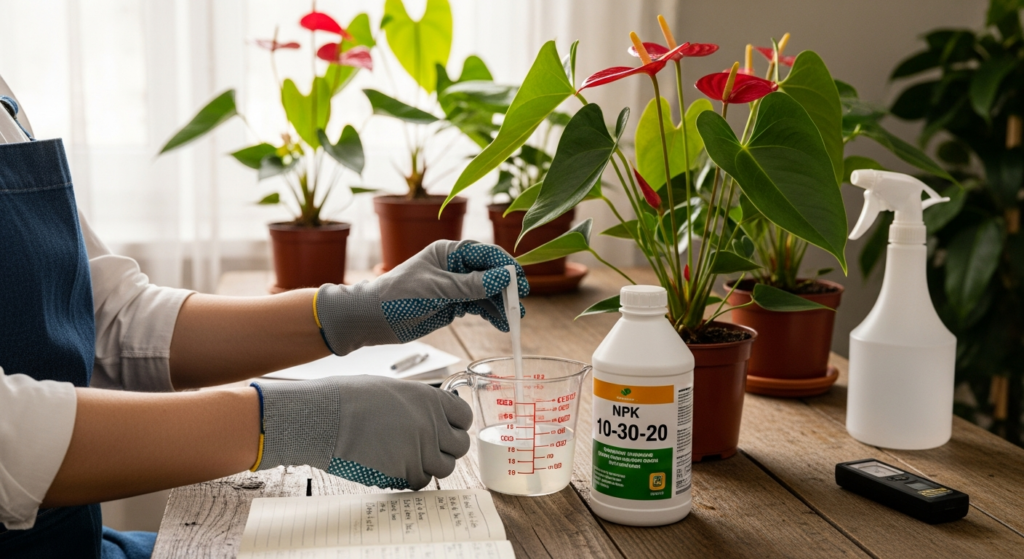
Use a balanced fertilizer with higher phosphorus during active growth. I switched from a 20-20-20 formula to a 10-30-20 bloom booster, and the difference showed up within two flowering cycles. The spathes grew nearly 30% larger and held deeper color.
Feed every two weeks during spring and summer when the plant actively grows. In fall and winter, drop to once monthly. Overfeeding creates salt buildup in the soil, which leads to those brown edges everyone complains about.
Dilute your fertilizer to half strength. Full-strength formulas burn Anthurium roots faster than most houseplants. I measure my liquid fertilizer at half the recommended dose and haven’t had root burn since making this change.
Flush the soil every two months. Run water through the pot for several minutes to wash out accumulated salts. This single practice prevented more brown-edge problems than any other change I made. The spathe tips stayed clean and the color remained vibrant longer.
Watch for these signs you’re feeding wrong:
- Brown, crispy leaf tips = salt buildup or overfertilizing
- Yellow lower leaves = nitrogen deficiency
- Weak, floppy spathes = phosphorus shortage
- Small flowers with thick leaves = too much nitrogen
Magnesium deficiency shows as yellowing between leaf veins while the veins stay green. Add Epsom salt (magnesium sulfate) at 1 teaspoon per gallon of water once every six weeks if you see this pattern.
Managing Aerial Roots Without Harming Your Plant
Those brown, fuzzy roots growing up from the base aren’t a problem—they’re how Anthuriums breathe and anchor themselves in their natural environment. Cutting them off weakens the plant.
Healthy aerial roots appear firm and brown with a fuzzy texture. Mushy, dark, or hollow roots indicate rot and should be removed. I check mine by gently squeezing—if they collapse easily, I trim them with sterilized scissors.
Mist aerial roots twice weekly during dry months. These roots absorb moisture from the air. When humidity drops below 50%, the roots dry out and stop functioning. I keep a spray bottle near my plants and give the aerial roots a quick spray whenever I water.
Direct aerial roots toward the soil surface if they’re long enough. The plant will push them into the potting mix on its own, creating better stability. I loosely guide wayward roots with my fingers during watering—no ties or stakes needed.
Never bury the main stem or crown when repotting. Anthuriums grow with their base slightly above the soil line. When aerial roots grow long enough to reach the soil, they’ll burrow in naturally. Forcing the crown down into the soil invites crown rot.
Some growers wrap aerial roots with sphagnum moss secured with fishing line. This works well for very long roots that won’t reach the pot, but most home situations don’t require this extra step.
| Aerial Root Condition | Action Needed | Why It Matters |
|---|---|---|
| Firm, brown, fuzzy | Mist regularly, leave alone | Healthy and functional |
| Dry, shriveled | Increase humidity, mist daily | Dehydrated but salvageable |
| Mushy, dark, hollow | Remove with clean scissors | Rotting, can spread disease |
| Growing horizontally | Gently guide toward soil | Improves stability |
| Very long (6+ inches) | Consider moss wrap or trim tip | Reduces stress on plant |
Repotting Without Stopping the Bloom Cycle
Anthuriums hate root disturbance during active blooming. Time your repotting for right after flowers fade or during early spring before new growth starts.
I repotted an Anthurium in full bloom once—it dropped all its developing spathes within a week and didn’t flower again for four months. Since then, I wait until I see no open flowers and no emerging spathes before touching the roots.
Choose a pot only 1-2 inches larger than the current one. Anthuriums bloom better when slightly rootbound. Too much space means the plant focuses on root growth instead of flowers. My best-flowering Anthurium sits in a pot that looks too small—the roots circle the bottom, but it produces 5-6 blooms at a time.
Use a chunky, fast-draining mix. Standard potting soil holds too much water and suffocates roots. I mix equal parts orchid bark, perlite, and peat moss or coco coir. The chunky texture lets roots breathe while maintaining enough moisture.
Here’s my repotting process:
- Water the plant two days before repotting—never repot dry soil
- Tip the pot and slide out the root ball gently
- Shake off loose soil but don’t tear roots
- Trim any mushy or dead roots with clean scissors
- Place in new pot at the same depth—never bury the crown
- Fill gaps with fresh mix, pressing gently to remove air pockets
- Water thoroughly until it drains from the bottom
- Place in bright, indirect light and skip fertilizer for four weeks
The no-fertilizer period matters. Damaged roots can’t handle nutrients immediately. Wait a full month before resuming your feeding schedule.
Signs your Anthurium needs repotting:
- Roots growing from drainage holes
- Water runs straight through without soaking in
- Plant dries out within a day or two of watering
- Growth has slowed or stopped
- Multiple aerial roots with no new leaves
Don’t repot just because the plant looks crowded. If it’s flowering well and growing steadily, leave it alone. I have an Anthurium that hasn’t been repotted in three years because it consistently produces blooms—why mess with success?
Light Quality vs. Quantity: What Actually Matters

You can give an Anthurium 12 hours of light daily and still get poor blooms if the light quality is wrong. These plants evolved under rainforest canopies where they received filtered, indirect light—not the harsh, direct rays that hit your windowsill.
Bright, indirect light means the plant sits in a well-lit room but sunlight doesn’t directly touch the leaves. I use this test: hold your hand between the light source and the plant. If you see a sharp, dark shadow, the light is too direct. A soft, blurry shadow means indirect light.
East-facing windows provide ideal conditions. Morning sun is gentler than afternoon sun, giving enough intensity without burning. My east-window Anthuriums produce the most consistent blooms with the best color.
South-facing windows work only with sheer curtains or when the plant sits several feet back. I keep mine three feet from the glass with a sheer white curtain between. Any closer and the leaves develop brown patches within weeks.
West-facing windows require more caution. Afternoon sun is intense and hot. If you only have west exposure, position the plant at least six feet from the window or use heavier filtering.
North-facing windows rarely provide enough light for good flowering. The spathes stay small and pale. I supplement with a grow light for 4-6 hours daily when my north-window plant is my only option.
Artificial lighting needs specific wavelengths. Full-spectrum LED grow lights work best. I run mine for 10-12 hours daily, positioned 12-18 inches above the plant. Regular household bulbs don’t provide the right spectrum for anthocyanin production.
| Light Source | Distance from Plant | Hours Needed | Bloom Quality |
|---|---|---|---|
| East window | Directly on sill | Natural day length | Excellent |
| South window (curtained) | 2-4 feet back | Natural day length | Very good |
| West window | 5-6 feet back | Natural day length | Good |
| North window alone | Any distance | Natural day length | Poor |
| Full-spectrum LED | 12-18 inches above | 10-12 hours | Good to very good |
Light intensity affects spathe size more than color. Too little light produces small, pale flowers. Too much light creates smaller spathes with good color but increases risk of leaf burn.
Duration matters less than consistency. An Anthurium that gets 8 hours of quality indirect light daily will outperform one that gets 12 hours of poor-quality light. Keep your plant in one spot instead of moving it around chasing the sun.
Fixing Brown Edges Before They Spread
Brown edges on Anthuriums signal specific problems that spread if ignored. The spathe develops crispy brown tips that gradually creep down the edges, eventually destroying the entire flower.
Low humidity causes most brown-edge issues. Anthuriums want 60-80% humidity but most homes sit at 30-40%. I run a humidifier near my plants and the difference is obvious—crispy edges decreased by about 70% within a month.
Salt buildup from fertilizer accumulates in soil over time. These salts pull moisture out of leaf and spathe edges, creating brown, crispy zones. Flush the soil every 8-10 weeks by running water through for 5 minutes, letting it drain completely between refills.
Inconsistent watering—either too dry or too wet—stresses the plant. Water when the top inch of soil feels dry. I stick my finger in up to the first knuckle. If it feels damp, I wait. If it’s dry, I water thoroughly until it drains from the bottom.
Chlorine and fluoride in tap water damage sensitive Anthurium tissue. These chemicals concentrate at leaf and spathe margins where water evaporates. I let tap water sit in an open container for 24 hours before using it, which releases most chlorine. For fluoride, which doesn’t evaporate, I use filtered or distilled water.
Temperature stress from cold drafts or hot air vents creates localized damage. Anthuriums exposed to temperatures below 60°F or above 85°F develop brown edges within days. I moved one plant away from an AC vent and the next blooms came out perfect.
Overfertilizing creates root burn that shows as brown edges first. If you see this pattern spreading quickly across multiple leaves and spathes, stop fertilizing immediately and flush the soil thoroughly. Wait six weeks before resuming at half strength.
Troubleshooting Brown Edge Problems:
- Edges brown and crispy + dry air = humidity too low
- Edges brown starting at tips + white crust on soil = salt buildup
- Edges brown with yellow halos = root damage or rot
- Edges brown on new growth only = fluoride in water
- Edges brown after repotting = root damage or transplant shock
- Edges brown in winter only = cold stress or dry heat
Once a spathe develops brown edges, that damage is permanent. Focus on preventing it in new growth. I trim off affected spathes once they’re more than 50% brown—they won’t recover and they drain energy the plant could use for new flowers.
Common Problems and Quick Solutions
Spathes stay closed or partially open: This usually means insufficient light or the plant is too young. Anthuriums under two years old often produce closed or malformed spathes. Move to brighter indirect light and wait for the next bloom cycle.
Flowers face downward instead of outward: Natural to some extent, but excessive drooping indicates weak stems from low phosphorus. Increase bloom-booster fertilizer and ensure the plant gets enough support from its root system.
New spathes are smaller than previous ones: Sign of declining nutrition or root issues. Check if the plant is rootbound, flush accumulated salts, and verify your fertilizing schedule. Smaller blooms often precede other problems.
Spathes develop brown spots: Usually fungal from too much moisture on the flowers. Water the soil directly and avoid misting open blooms. Increase air circulation with a small fan.
Plant produces leaves but no flowers: Too much nitrogen, insufficient light, or the plant is too young. Switch to a bloom-promoting fertilizer, increase light exposure, and be patient—healthy Anthuriums can take 4-6 months between bloom cycles.
| Problem | Most Likely Cause | Fastest Fix |
|---|---|---|
| Green spathes | Low light or wrong fertilizer | Move to brighter spot, use bloom booster |
| Small flowers | Nutrient deficiency or rootbound | Fertilize regularly, check roots |
| Brown edges | Low humidity or salt buildup | Increase humidity, flush soil |
| No blooms | Too much nitrogen or insufficient light | Switch fertilizer, improve light |
| Drooping flowers | Underwatering or weak stems | Water consistently, add phosphorus |
Water Quality and Its Effect on Bloom Color
The minerals in your water directly affect anthocyanin production. Hard water with high calcium and magnesium creates alkaline soil conditions that lock out nutrients needed for red pigmentation.
I tested my tap water and found it measured 7.8 pH—too alkaline for Anthuriums, which prefer 5.5-6.5. After switching to filtered water, my spathes developed richer, more saturated reds over the next three bloom cycles.
Fluoride in municipal water causes necrosis at leaf and spathe tips. Many cities add fluoride for dental health, but it accumulates in plant tissue. Distilled water or reverse osmosis systems remove it completely.
Chloramine (chlorine + ammonia) doesn’t evaporate like chlorine. If your water contains chloramine, letting it sit won’t help. Use a dechlorinator from pet stores or switch to filtered water.
Test your water with an inexpensive pH meter or test strips. If it measures above 7.0, consider these options:
- Use distilled or reverse osmosis water
- Collect rainwater (if your area has clean rain)
- Add a few drops of white vinegar to lower pH slightly
- Install a basic carbon filter on your tap
Water Quality Comparison:
- Tap water (hard, 7.5+ pH) = Pale blooms, brown edges, mineral buildup
- Tap water (soft, 6.5-7.0 pH) = Acceptable, may need flushing
- Filtered water (6.0-6.5 pH) = Good bloom color, less buildup
- Distilled/RO water (5.5-6.0 pH) = Best color, no mineral issues
- Rainwater (5.5-6.5 pH) = Excellent, naturally soft
Temperature of water matters too. Cold water shocks roots and slows nutrient uptake. I fill my watering can and let it reach room temperature before watering. Takes 2-3 hours but prevents stress.
Timing Your Expectations for Color Change
Don’t expect overnight transformations. Anthuriums respond slowly to care changes because each bloom takes 6-8 weeks to develop from initial bud to full color.
The spathe you see forming today reflects the care from two months ago. Any changes you make now will show up in the next bloom cycle, not the current one.
I track this in a simple notebook—when I make changes (new fertilizer, different location, humidity boost), I note the date and then observe the blooms that emerge 8-12 weeks later. This prevents me from making too many changes at once and helps me identify what actually works.
Most care improvements show results within 2-3 bloom cycles. If you fix your lighting and feeding today, expect to see bigger, redder spathes starting around 4-6 months from now. Younger plants or severely stressed plants may take longer.
Seasonal Adjustments for Consistent Blooms
Anthuriums slow down in winter even indoors. Shorter days and lower humidity affect bloom production regardless of care quality.
I adjust my routine seasonally:
Spring/Summer (Active Growth):
- Fertilize every two weeks
- Water when top inch dries (usually twice weekly)
- Maintain humidity at 60-70%
- Keep temperatures 70-80°F
Fall/Winter (Slower Growth):
- Fertilize once monthly
- Water when top two inches dry (usually weekly)
- Increase humidity efforts (heating dries air)
- Maintain temperatures 65-75°F
- Consider supplemental lighting if days are short
This seasonal adjustment prevents overfeeding during dormancy while maintaining enough support for the plant to bloom. My Anthuriums typically produce 3-4 blooms in spring/summer and 1-2 in fall/winter.
Frequently Asked Questions
How long does it take for an Anthurium spathe to change from green to red?
The color develops as the spathe opens. If a spathe emerges green and stays green after fully opening (7-10 days), it won’t turn red later. The pigmentation happens during opening. Future blooms will show color changes based on improved care, but current green spathes remain green.
Can I make my white Anthurium turn red?
No. White Anthuriums are different varieties with genetic differences in pigment production. No amount of care will make a white variety produce red blooms. However, pale pink varieties can develop deeper red tones with proper care.
Why do my Anthurium blooms last only two weeks instead of months?
Short-lived blooms indicate stress—usually from low humidity, temperature fluctuations, or inconsistent watering. Healthy Anthurium spathes last 6-8 weeks minimum. Improve environmental stability and the next blooms should last longer.
Should I cut off green or brown spathes?
Yes. Cut spent blooms where the stem meets the main plant using clean scissors. This redirects energy to new growth and flowers. I remove any spathe that’s more than 50% brown or has finished its display cycle.
Conclusion
Getting vibrant red Anthuriums instead of pale green disappointments comes down to light quality, proper feeding with bloom-specific fertilizer, managing humidity above 60%, and using clean water. The changes take time—expect to see results in 4-6 months as new blooms reflect your improved care.
Focus on consistency rather than perfection. A plant that gets adequate care year-round will outperform one that receives intense but sporadic attention. Start with fixing your water quality and light positioning since these create the biggest impact with the least effort.
Track what you change and when. This prevents you from abandoning strategies that work but need time to show results. Your best blooms are forming right now—you just won’t see them for another two months.
What’s been your biggest challenge with Anthurium blooms—getting them to turn red, keeping edges from browning, or something else entirely? Share your experience in the comments below.