You bought a beautiful flowering plant stand with three or four levels. You carefully arranged your blooms, stepped back to admire your work, and within two weeks, half your plants looked terrible. The top ones were thriving while the bottom ones dropped leaves. Sound familiar?
This happens because most people treat tiered stands like shelves—putting plants wherever they fit. But light drops off dramatically with each level. Water drips from top to bottom. And that gorgeous arrangement you created? It might be slowly killing your shade-loving plants.
In this guide, I’ll show you exactly how to arrange flowering plants on tiered stands so each one gets what it needs. You’ll learn which plants go where, how to stop water damage, and how to create displays that stay beautiful for months.
I’m Darcey Wren, and I’ve spent years testing different flowering houseplants in various indoor setups. After watching too many beginner mistakes (including plenty of my own), I started documenting what actually works. My apartment has three tiered stands now, and I’ve learned through trial and error which combinations thrive and which fail.
Understanding Light Distribution on Tiered Stands
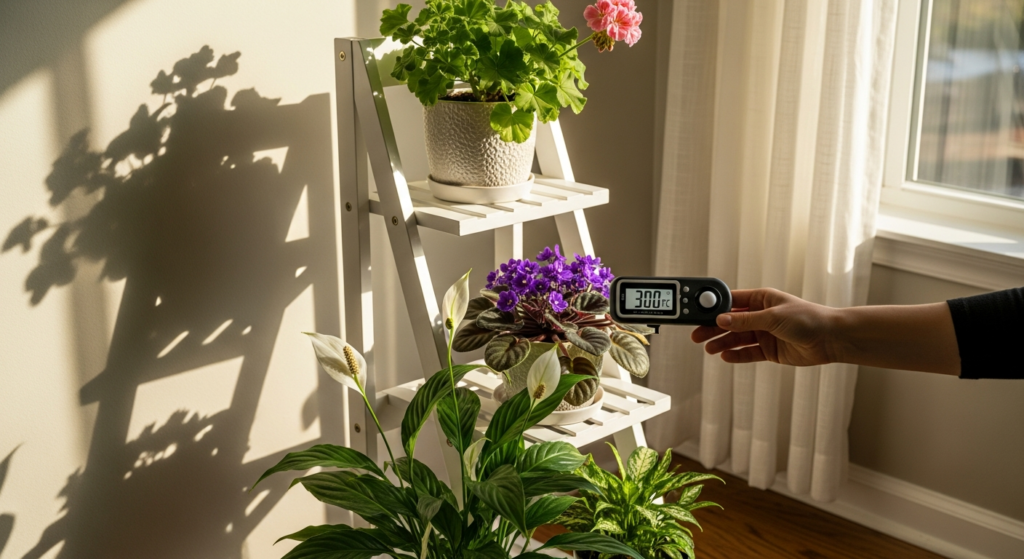
Light behaves differently than most people expect on vertical stands. The top shelf gets the most direct light, but each level below receives progressively less.
I measured this with a light meter in my east-facing window. The top tier got about 800 foot-candles of morning sun. The middle tier dropped to roughly 300 foot-candles. The bottom? Just 100 foot-candles, even though they were only 18 inches apart.
This isn’t just about distance from the window. Each shelf creates a shadow that affects the one below it. Wider shelves create deeper shadows. Plants on upper levels block light from reaching lower ones. Even the stand’s frame can create shade patterns throughout the day.
Here’s what this means: you can’t just put any plant anywhere. A sun-loving hibiscus on the bottom shelf will stretch toward light and eventually stop blooming. A peace lily on the top shelf might get scorched leaves.
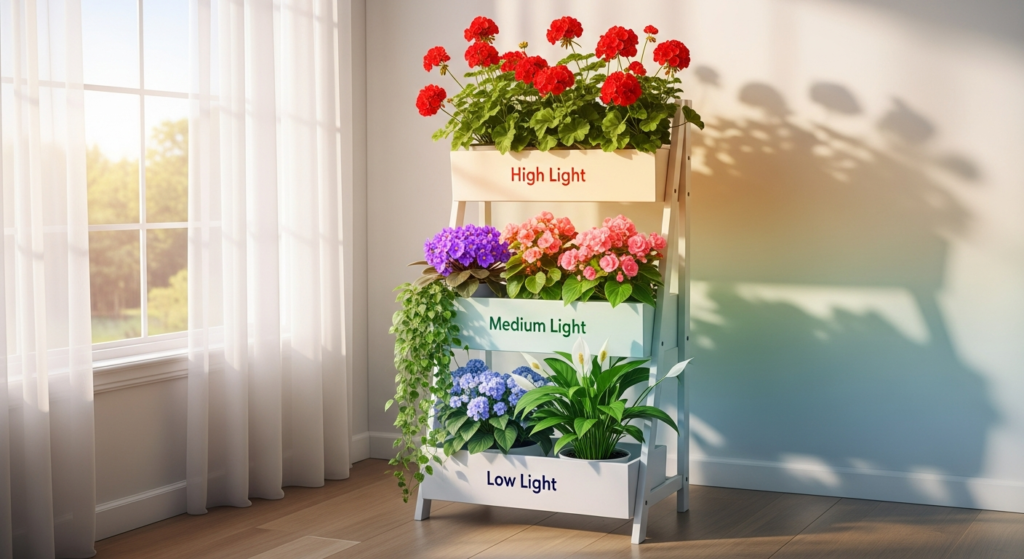
How Light Intensity Changes by Level
Different stand positions create distinct growing zones:
Top Tier: Receives the most direct light—perfect for high-light bloomers. This level works for plants that naturally grow in full sun or bright conditions. In a south-facing window, this spot might be too intense during summer afternoons.
Middle Tier: Gets moderate, filtered light. Many flowering plants actually prefer this level because it mimics the dappled shade of their natural habitat. Morning sun reaches here but harsh afternoon rays often miss it.
Bottom Tier: Low to medium light zone. Direct sun rarely reaches this level, even near windows. Only shade-tolerant bloomers survive here long-term.
I rotate my stands every two weeks so no plant stays in low light permanently. Even shade lovers need some brighter periods to maintain flowering.
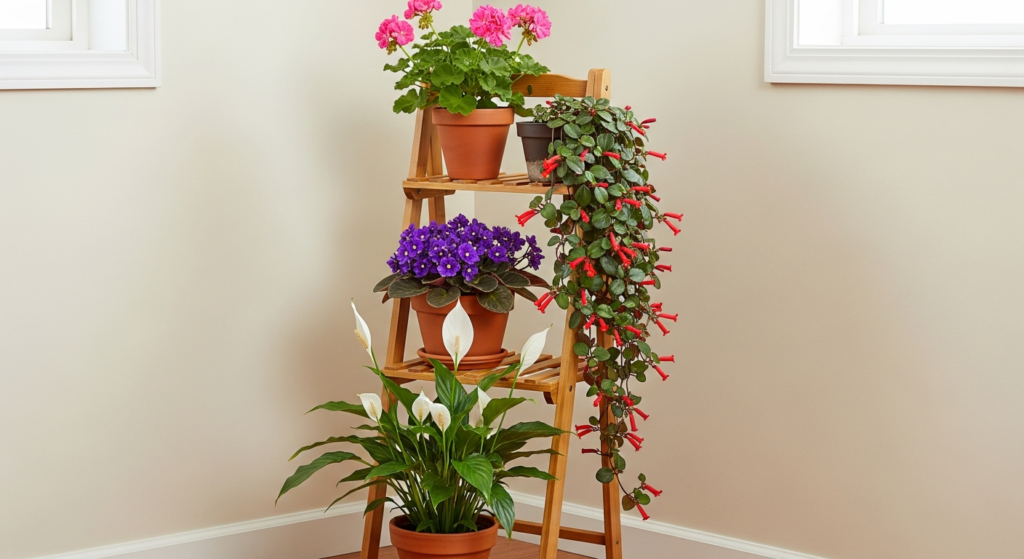
Matching Plants to Each Tier Level
Success starts with putting the right plant in the right spot. Here’s my system based on light requirements.
Top Tier: High-Light Bloomers
These plants need at least 6-8 hours of bright light daily:
Geraniums thrive here—they’re practically impossible to overexpose. Mine bloom continuously from March through October on the top shelf. The flowers stay vibrant and stems remain compact.
Kalanchoes also love top positions. They’re succulents that produce clusters of small flowers. Without enough light, they get leggy and stop blooming entirely.
Jasmine needs intense light for its fragrant white flowers. I keep mine on the top tier of my south-facing stand. It blooms best when it gets that strong afternoon light.
Crown of thorns tolerates lower light but flowers much better up top. The more sun it gets, the more red or pink blooms it produces.
Middle Tier: Moderate-Light Bloomers
This is where most flowering houseplants feel comfortable:
African violets perform beautifully here. They need bright light but direct sun burns their leaves. The middle tier gives them that sweet spot—enough light to flower but not so much that foliage suffers.
Begonias (especially rex and angel wing types) appreciate filtered light. I’ve had the same three begonias on my middle shelves for two years. They bloom reliably every spring and fall.
Streptocarpus (Cape primrose) produces purple, pink, or white flowers in medium light. Too much sun bleaches the blooms. Too little stops flowering.
Lipstick plants cascade nicely from middle shelves while getting enough light for their tubular red flowers. The vines hang down without blocking lower plants too much.
Bottom Tier: Low-Light Bloomers
Finding plants that actually flower in low light is challenging, but these work:
Peace lilies are my go-to for bottom shelves. They produce white spathes (modified leaves that look like flowers) even in dim conditions. Mine has bloomed consistently for three years on the bottom tier.
Spathiphyllum (another peace lily variety) handles deep shade better than almost any flowering plant. The blooms aren’t as prolific as in brighter spots, but they appear regularly.
Certain orchids, particularly Phalaenopsis, can bloom on lower tiers if they get bright indirect light from nearby windows. I’ve successfully kept one on my bottom shelf in an east-facing setup.
Primroses work temporarily on bottom shelves during their bloom period. Once flowers fade, I move them up or outside.
Light Requirements Comparison
| Plant Type | Top Tier | Middle Tier | Bottom Tier | Bloom Frequency |
|---|---|---|---|---|
| Geranium | Excellent | Good | Poor | Continuous (spring-fall) |
| African Violet | Burns | Excellent | Struggles | Every 6-8 weeks |
| Peace Lily | Tolerates | Good | Excellent | Every 2-3 months |
| Jasmine | Excellent | Adequate | Fails | Spring/summer |
| Begonia | Too intense | Excellent | Possible | Seasonal |
| Kalanchoe | Excellent | Adequate | Stretches | Winter/spring |
Preventing Water Damage Between Levels
Water is the second-biggest challenge with tiered stands. I learned this the hard way when I watered everything from top to bottom one morning. By evening, my middle-tier African violets had water spots all over their leaves. The bottom shelf collected a puddle.
Using Proper Drainage Systems
Every pot needs a drainage hole. Non-negotiable. Even if the pot is decorative, the actual growing container inside it must drain.
I use a double-pot system: the plant grows in a plastic nursery pot with holes, which sits inside a decorative cachepot. After watering, I lift out the nursery pot, let excess water drain completely in the sink, then return it to the cachepot.
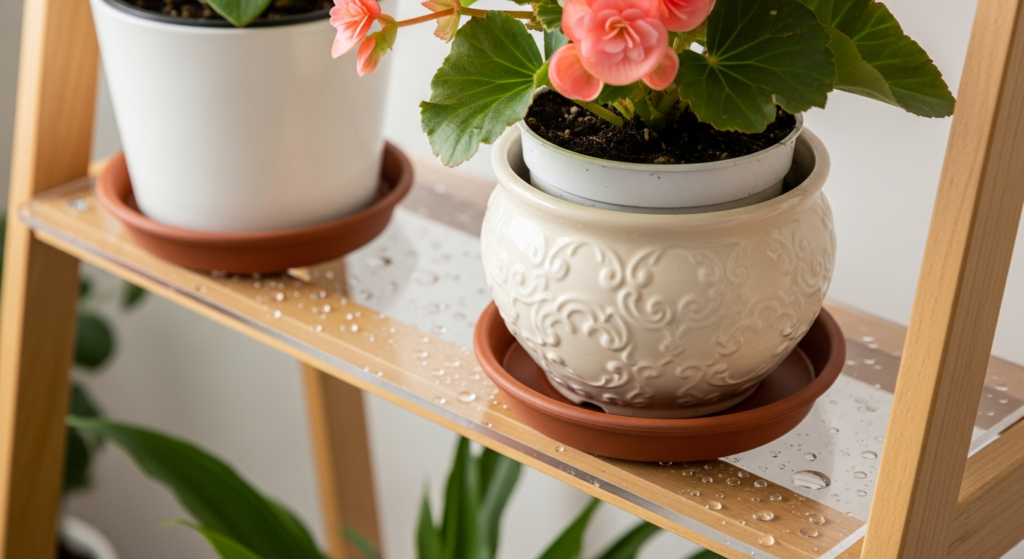
Saucers are essential but they create their own problems. Too-small saucers overflow. Too-large saucers collect standing water that breeds gnats and causes root rot.
For top-tier plants, I use deep saucers (at least 1 inch deep) that catch all runoff. Middle and bottom tiers get slightly larger saucers since they might catch drips from above.
Some people skip saucers entirely and remove plants for watering. This works if you’re disciplined about it. I’m not always that careful, so saucers save me.
Waterproofing Lower Shelves
Even with saucers, water finds a way to drip down. Here’s my protection system:
I cut clear acrylic sheets to fit each shelf, leaving a 1-inch lip around the edges. These sheets are removable for cleaning but stay in place during normal use. Hardware stores cut acrylic to size for about $10 per sheet.
Alternatively, thick cork mats absorb minor spills and protect wood or metal surfaces. I replace these every six months since they eventually deteriorate from constant moisture.
For stands near walls, I keep the back edge 3-4 inches away from the wall. This prevents water from seeping behind the stand where you won’t notice it until mold appears.
Watering Schedule Strategy
I water plants on different days based on their tier position. Top-tier plants get watered Monday and Thursday (they dry out faster). Middle-tier plants get watered Tuesday and Friday. Bottom-tier plants only need water on Wednesdays.
This staggered schedule prevents the chaos of watering everything at once. It also helps me notice which plants actually need water versus which ones I’m just watering out of habit.
I always water in the morning. This gives any spills time to evaporate during the day rather than sitting overnight when air circulation is lower.
Seasonal Rotation Strategies
Plants don’t thrive staying in one spot year-round. Light changes with seasons. Growth patterns shift. Regular rotation keeps everything healthy.
When and How to Rotate
I rotate my stands every two weeks. This seems frequent, but it prevents weak, one-sided growth where plants lean permanently toward light.
During rotation, I move plants one tier up or down (not to a completely different location). A top-tier geranium goes to middle tier. The middle begonia goes to bottom. The bottom peace lily goes to top for a brief bright-light vacation.
Not every plant moves during each rotation. Sun-lovers stay mostly on top, just shifting positions on that same tier. Shade-lovers stay lower. But everyone gets some position change to encourage balanced growth.
Adjusting for Winter vs. Summer Light
Winter changes everything. The sun sits lower in the sky, which actually means my lower tiers get more direct light from November through February. I adjust by moving some shade-tolerant plants up and bringing sun-lovers down slightly.
My south-facing window becomes much more intense in winter when trees lose their leaves. I sometimes move the entire stand 2-3 feet back from the window during December and January.
Summer brings different challenges. The high sun angle means top tiers get scorching afternoon light while lower tiers stay in deeper shadow. I shift more plants to middle and bottom tiers during June and July.
Signs a Plant Needs Repositioning
Stretched stems tell you a plant needs more light. If your once-compact begonia develops long spaces between leaves, move it up a tier.
Pale or yellowing leaves (when you’re watering correctly) often signal too much light. I’ve seen this with African violets that got bumped to the top tier—their leaves faded within a week.
Dropped buds before opening mean stress—usually from wrong light levels. Peace lilies do this when they’re too bright. Geraniums do it when too dark.
Stopped flowering despite good care almost always means wrong light. This is your clearest signal to reposition that plant.
Rotation Schedule
| Season | Top Tier Adjustment | Middle Tier Adjustment | Bottom Tier Adjustment |
|---|---|---|---|
| Spring | Move 6″ closer to window | Keep stable | Rotate plants weekly |
| Summer | Move back 12″ or add sheer curtain | Keep stable | Move some to middle |
| Fall | Return to spring position | Prepare for winter sun | Rotate less often |
| Winter | Move lower-light plants here | May get direct sun now | Less light—supplement? |
Mixing Textures and Colors Effectively
A stand full of green plants with similar leaf shapes looks boring. Strategic variety creates visual interest without turning your stand into chaos.
Color Coordination Principles
I use a three-color rule: pick one dominant color (usually green foliage), one accent color (bloom color or foliage variegation), and one neutral (white, cream, or another green shade).
My east-facing stand runs pink and purple blooms with silver-green foliage. Top tier has pink geraniums, middle has purple African violets and Streptocarpus, bottom has a white peace lily. The foliage includes both bright green and silvery-green tones.
Avoid too many competing bloom colors in one stand. Red geraniums next to orange kalanchoe next to purple begonias fights for attention. Your eye doesn’t know where to look.
Group similar colors by tier. All warm colors (reds, oranges, yellows) on upper tiers catch light beautifully. Cool colors (blues, purples, whites) work anywhere but look especially nice on middle and lower tiers where they seem to glow in softer light.
Texture Combinations That Work
Mix leaf sizes intentionally. Large-leafed plants like certain begonias provide bold statements. Small-leafed plants like baby tears or Fittonia create delicate contrast.
I pair smooth, glossy leaves (like hoya or jasmine) with fuzzy, matte leaves (like African violets). The light hits them differently, which adds depth.
Trailing plants break up the horizontal lines of tiers. I keep lipstick plants and string of hearts on middle shelves where their vines cascade without blocking lower plants completely.
Upright, spiky plants (like some bromeliads) contrast nicely with mounding plants. But don’t put tall spiky plants on upper tiers—they block too much light from reaching down.
Creating Visual Height Variation
Even on the same tier, vary plant heights with pot risers or small stands. I use upside-down terracotta saucers to elevate smaller plants so they’re not hidden behind larger ones.
Group plants in odd numbers when possible. Three small pots look more natural than two or four. This isn’t a strict rule but it helps avoid overly symmetrical arrangements that feel stiff.
Leave some empty space. Overcrowded stands prevent air circulation and make it hard to water individual plants. I keep about 20% of shelf space open.
Troubleshooting Common Problems
Even with careful planning, problems happen. Here’s what I’ve dealt with and how I fixed it.
Top Tier Plants Getting Leggy Despite Sun
This seems contradictory but happens when plants get intense light for only part of the day. They stretch during dark periods searching for consistent light.
I fixed this by adding a small grow light that extends the light period to 12-14 hours daily. The plants stopped stretching within two weeks.
Another cause: wrong plant for that tier. I once kept a begonia on top thinking it needed full sun. It stretched badly. Moving it to middle tier solved everything.
Bottom Tier Plants Not Flowering
This is the most common complaint. Bottom tiers just don’t get enough light for most flowering plants.
My solution: rotate plants through the bottom tier rather than keeping anything there permanently. Peace lilies stay there longest (months), but even they get a week or two on higher tiers every so often.
Another option: add supplemental lighting under each shelf. Small LED strip lights work well. I installed these on my bedroom stand and bottom-tier African violets actually bloom now.
Water Stains on Lower Tier Plants
This happens when you water top plants too generously. Excess water drips down despite saucers.
I started watering more slowly, giving water time to absorb rather than running through quickly. I also reduced water volume per session.
For African violets and other plants with sensitive leaves, I bottom-water exclusively now. The pot sits in a water-filled saucer for 30 minutes, then I dump any remaining water. No drips, no spots.
One Side Growing Better Than Other
This signals uneven light distribution. Probably the stand sits angled to a window or wall.
I rotate the entire stand 180 degrees every week now. Each side gets equal time facing the window. Plants grow much more evenly.
Pest Problems Spreading Through Tiers
Aphids, spider mites, and mealybugs love to climb from plant to plant on stands. The close quarters help them spread fast.
I inspect plants during every watering now. Any pest problems get isolated immediately—that plant comes off the stand until treated.
I also keep a small spray bottle with diluted neem oil solution nearby. At first signs of pests, I spray all plants on that tier preventatively.
Common Issues and Solutions
| Problem | Likely Cause | Quick Fix | Long-term Solution |
|---|---|---|---|
| Leggy top-tier plants | Inconsistent light periods | Add grow light | Choose more compact varieties |
| No blooms on bottom | Insufficient light | Rotate to higher tier weekly | Add under-shelf lighting |
| Water damage on wood | Overflow from upper tiers | Better saucers | Acrylic shelf liners |
| Uneven growth | Stand not facing window evenly | Rotate stand weekly | Reposition stand location |
| Pest spread | Close plant proximity | Isolate affected plants | Regular inspections |
Maximizing Limited Floor Space
Tiered stands work brilliantly in small apartments because they use vertical space efficiently. My bedroom is only 10×12 feet but holds three stands without feeling crowded.
Choosing the Right Stand Size
Measure your space before buying. I learned this after bringing home a five-tier stand that was too tall for my window height. The top tier literally hit the curtain rod.
For standard 8-foot ceilings with 36-inch windowsills, a three-tier stand about 30-36 inches tall works perfectly. Four-tier stands (40-48 inches) fit if you have higher windows or place them away from walls.
Stand width matters as much as height. I prefer stands 24-30 inches wide—large enough for multiple plants per tier but not so large they dominate the room.
Corner vs. Window Placement
Corner stands maximize dead space but usually get less light. I keep shade-loving plants on my corner stand: peace lilies, certain begonias, and foliage plants.
Window-adjacent stands get the best natural light. These hold my blooming geraniums, African violets, and jasmine. I position them 6-12 inches from the window—close enough for good light but not so close that summer sun scorches leaves.
Freestanding stands in room centers work if you add grow lights. I have one in my living room positioned away from windows that relies entirely on overhead LED fixtures.
Combining Multiple Stands
When you have room for multiple stands, create distinct zones. My bedroom has a high-light stand near the window and a low-light stand in the corner. I move plants between them as needed.
Different stand styles add visual interest. I mix a metal ladder-style stand with a wooden tiered shelf and a bamboo plant theater. They don’t match perfectly but the variety feels intentional rather than cluttered.
Keep pathways clear. I maintain at least 24 inches of walking space around stands so I can access all sides for watering and inspection.
Advanced Display Techniques
Once you master basics, these techniques create truly striking displays.
Backdrop and Background Considerations
Light-colored walls reflect more light onto lower tiers. My stands near white walls perform noticeably better than those near navy blue walls.
I hung a large mirror behind one stand. This roughly doubles the light reaching the back of plants. Blooms on the back side develop as well as those facing forward now.
Avoid busy wallpaper or patterns behind stands. They compete visually with plants. Plain walls let the plants become the focal point.
Integrating Grow Lights Seamlessly
Small LED strips tucked under each shelf provide extra light without industrial appearance. I use warm white (3000K) LEDs that look like natural light.
Clip-on grow lights work for individual plants that need extra boost. I keep two clipped to my top-tier frame, aimed at specific plants.
For whole-stand lighting, gooseneck grow lights arch over from behind. Position them so the light source isn’t visible from your normal viewing angle.
Seasonal Theme Changes
I switch out bloom colors with seasons. Spring brings pastel African violets and white jasmine. Summer means bright red geraniums. Fall introduces purple Streptocarpus and burgundy begonias.
Adding small decorative elements works too—tiny pumpkins in October, silver ornaments in December. But plants remain the star. Decorations shouldn’t overtake the display.
Using Cascading Plants Strategically
Trailing plants on upper tiers create living curtains without blocking too much light. I keep string of hearts on my top tier where its thin vines drape gracefully but don’t shade lower plants heavily.
Avoid thick trailing plants (like pothos) on top tiers—they create too much shadow. Save these for middle tiers where some shading actually helps protect shade-lovers below.
Position trailing plants at tier corners where vines hang freely without tangling with other plants.
FAQs
How often should I rotate plants between tiers?
I rotate every two weeks, moving plants one tier up or down. This prevents uneven growth and gives each plant varied light exposure. Sun-lovers stay mostly on top tier but shift positions. Shade-lovers stay lower but everyone gets some movement. Watch for signs plants are stretching or fading—that means they need repositioning sooner.
Can I use tiered stands in rooms without windows?
Yes, but you’ll need grow lights for flowering plants to bloom. Regular overhead room lights aren’t strong enough. Install full-spectrum LED grow lights (at least 2000 lumens) that run 12-14 hours daily. I keep a stand in my windowless bathroom successfully using two clip-on grow lights. Only shade-tolerant bloomers like peace lilies will work without supplemental lighting.
What’s the best way to clean dust from lower-tier plants?
I remove plants from the stand entirely for cleaning every month. Bring them to a sink or shower and gently spray leaves with room-temperature water. For fuzzy-leaved plants like African violets, use a soft brush instead. Never use leaf-shine products—they clog pores and cause more problems than they solve. Clean stands get more light to lower tiers, which helps blooming.
How do I prevent the stand from becoming top-heavy and tipping?
Choose stands with wide bases—base should be at least two-thirds the width of the top tier. Anchor tall stands to walls with furniture straps if you have pets or small children. Distribute weight evenly across all tiers rather than loading everything on top. I keep my heaviest pots on middle and bottom tiers. Consider stand material too—metal and wood are sturdier than plastic.
Conclusion
Tiered stands transform how you grow flowering plants indoors, but only if you match plants to light levels, prevent water damage, and rotate regularly. Put your sun-loving geraniums and jasmine on top where they’ll get 6-8 hours of bright light. Keep shade-tolerant peace lilies and certain orchids on bottom tiers. Position your moderate-light African violets and begonias in the middle.
Protect lower shelves with acrylic sheets or cork mats to catch drips. Water plants on staggered schedules so you’re not dealing with multiple tiers draining at once. Rotate plants every two weeks to prevent lopsided growth.
Most importantly, watch your plants closely. They’ll tell you what they need—stretching stems mean more light, pale leaves mean less, dropped buds mean something’s wrong. Adjust tier positions based on what you observe.
Start with one three-tier stand and 3-5 plants you already know. Get comfortable with the system before expanding. You’ll figure out your space’s particular light patterns and which plants thrive where.
What flowering plants are you growing right now, and where are you struggling to find space for them? Drop a comment below—I’d like to hear what you’re working with.