You walk into your favorite plant shop, and there it is—a lush plant suspended in mid-air, wrapped in a perfect sphere of moss, no pot in sight. It looks like something out of a fairy tale, yet it’s sitting right there in the houseplant section. You want one, but you’re not sure where to start.
Here’s the problem: traditional potted plants take up counter space, shelf space, and sometimes they just don’t fit your style. You want something different, something that feels more artistic and connected to nature. But most hanging planters are plastic or ceramic, and they still feel… ordinary.
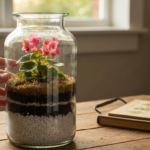
That’s where kokedama changes everything. These Japanese moss balls turn your flowering plants into living art pieces that hang from ceilings, sit on driftwood, or rest in shallow bowls. They save space, look stunning, and bring a touch of Zen into your home. The moss becomes the container, the roots grow happy and healthy inside, and you get a conversation piece that actually blooms.
I’m Darcey Wren, and I’ve been growing and writing about indoor flowering houseplants for several years now. My first kokedama was a disaster—the moss fell apart within a week, and I nearly gave up. But after experimenting with different wrapping techniques and testing various flowering species, I found what works. I’ve made kokedama with everything from African violets to orchids, and I’ve learned which plants thrive in moss balls and which ones struggle. What started as curiosity about this traditional Japanese technique turned into a genuine passion for creating these living sculptures.
What Is Kokedama and Why It Works for Flowering Plants
Kokedama translates to “moss ball” in Japanese. The technique comes from bonsai culture, where gardeners would create temporary displays by wrapping root balls in soil and moss. Unlike bonsai, though, kokedama doesn’t require years of training or special tools.
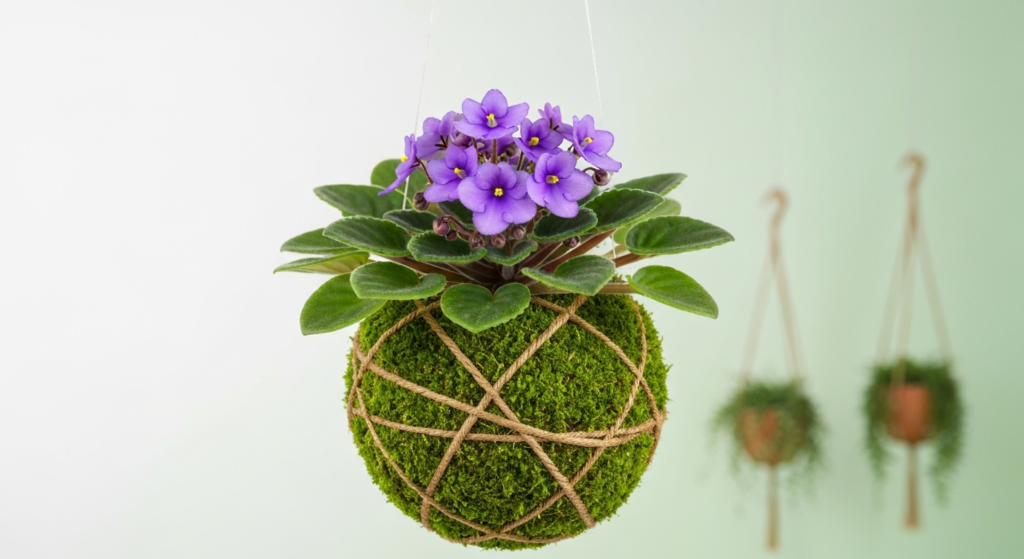
The basic structure is simple: you take a plant’s root ball, wrap it in a mixture of soil and clay, cover the whole thing with sheet moss, and secure it with string. The moss holds moisture like a sponge, the clay helps the ball keep its shape, and the string keeps everything together.
Flowering plants work surprisingly well in kokedama because the compact root environment often encourages blooming. When roots are slightly restricted (not root-bound, just cozy), many flowering species put their energy into making flowers rather than expanding their root systems. I’ve seen African violets bloom more consistently in kokedama than they ever did in regular pots.
The moss also provides excellent drainage. Water moves through it quickly, which prevents the soggy soil conditions that cause root rot. For flowering plants that hate “wet feet,” this is perfect.
Best Flowering Plants for Kokedama
Not every flowering plant adapts well to moss ball life. You need species with compact root systems, moderate water needs, and the ability to handle some humidity variation.
African Violets
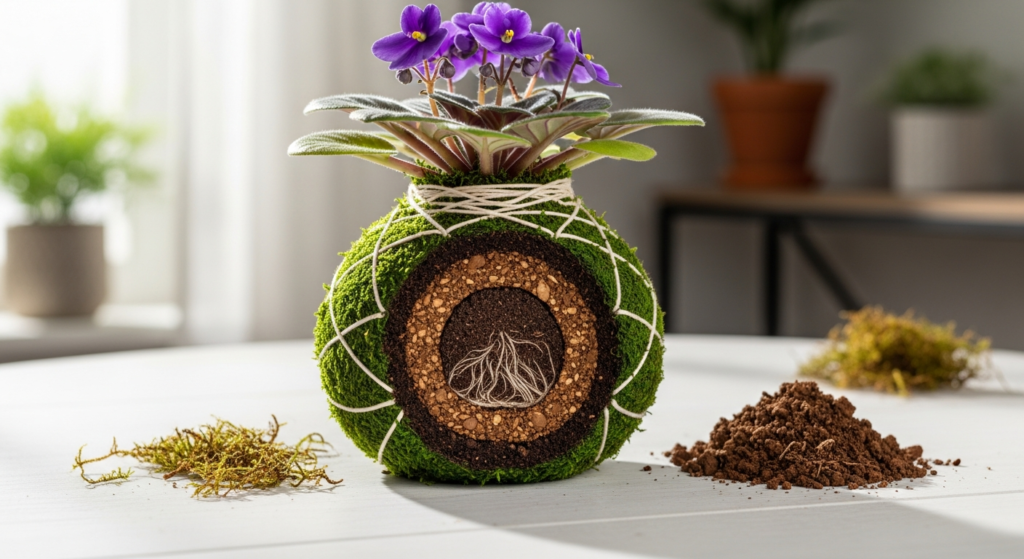
African violets are my top recommendation for kokedama beginners. Their root systems stay small, they bloom almost constantly with proper care, and they tolerate the moisture fluctuations that come with moss ball growing.
I’ve had an African violet kokedama hanging in my bathroom for over a year. It blooms in cycles—three weeks of flowers, one week of rest, then more flowers. The bathroom humidity keeps the moss from drying out too quickly.
These plants need bright, indirect light. Too much sun bleaches their leaves and burns the flowers. In kokedama form, you can hang them near east-facing windows or under grow lights.
Orchids (Phalaenopsis)
Moth orchids adapt beautifully to kokedama because they’re naturally epiphytic—they grow on trees in the wild, not in soil. Their roots actually prefer being exposed to air, which makes the breathable moss covering ideal.
When I made my first orchid kokedama, I used pure sphagnum moss instead of soil mix. The roots grew through the moss and into the air, which is exactly what they want to do. The plant bloomed twice in one year.
The key is keeping the moss moist but never soggy. Orchids hate sitting in water, but they need humidity around their roots. Kokedama solves this by providing moisture that drains quickly.
Begonias
Wax begonias and smaller fibrous begonias work well in moss balls. They have shallow root systems and produce cheerful flowers in pink, red, or white throughout the growing season.
I prefer the compact varieties for kokedama—the ones that stay under 8 inches tall. Larger begonias get too heavy and can pull the moss ball apart over time.
Begonias need consistent moisture. The moss dries out faster than potting soil, so you’ll water more often. In summer, my begonia kokedama needs soaking every 3-4 days. In winter, once a week is enough.
Lipstick Plants
Lipstick plants (Aeschynanthus) produce tubular red flowers that look like tiny lipstick tubes emerging from the foliage. They’re trailing plants, which makes them perfect for hanging kokedama displays.
The stems cascade down from the moss ball, creating a waterfall effect. When the plant blooms, you get bright red flowers scattered throughout the trailing stems.
These plants like to dry out slightly between waterings, which works well with the faster-draining nature of kokedama. I water mine when the moss feels dry on the outside but still slightly damp inside.
Comparison of Flowering Plants for Kokedama
| Plant | Root Size | Water Needs | Light Requirements | Bloom Frequency | Difficulty |
|---|---|---|---|---|---|
| African Violet | Small | Moderate | Bright indirect | Continuous | Easy |
| Phalaenopsis Orchid | Medium | Low to moderate | Bright indirect | 1-2 times/year | Moderate |
| Wax Begonia | Small to medium | Moderate to high | Bright indirect | Seasonal | Easy |
| Lipstick Plant | Medium | Moderate | Bright indirect to some sun | Seasonal | Moderate |
| Kalanchoe | Small | Low | Bright direct or indirect | Seasonal | Easy |
How to Make a Kokedama with a Flowering Plant
Making your first kokedama takes about 30 minutes. You’ll need a few supplies, but nothing expensive or hard to find.
Materials You Need
- Your chosen flowering plant
- Bonsai soil or houseplant potting mix
- Peat moss or coconut coir
- Clay powder (akadama clay is traditional, but any clay works)
- Sheet moss (live or preserved)
- Cotton string or fishing line
- A bowl of water
- Scissors
The soil mix needs to hold together when wet but still drain well. I use 60% bonsai soil, 30% peat moss, and 10% clay powder. This combination stays together in a ball shape without becoming waterlogged.
Step-by-Step Process
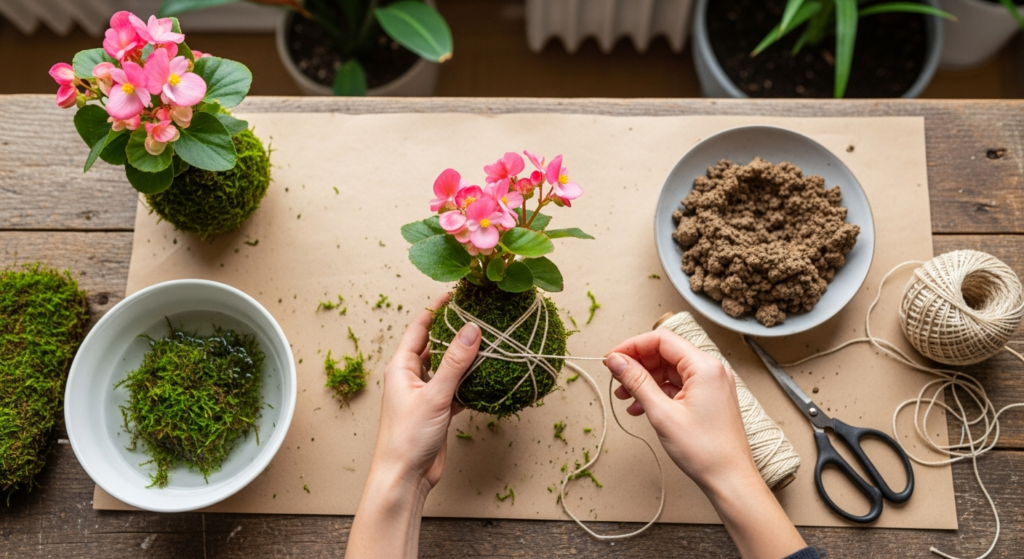
First, remove your plant from its current pot and gently shake off about half the soil from the roots. You don’t need to remove all of it—just enough to reduce the root ball size.
Mix your soil, peat moss, and clay powder in a bowl. Add water gradually and knead it like bread dough until it holds together when squeezed. The consistency should feel like wet clay—moldable but not dripping.
Form a ball of soil mix slightly larger than your plant’s remaining root ball. Make a hole in the center with your fingers. Place the plant’s roots into this hole and add more soil mix around them. Shape everything into a ball, pressing firmly so it holds together.
Soak your sheet moss in water for a few minutes to make it pliable. Squeeze out excess water. Wrap the moss around the soil ball, green side out. Don’t worry about coverage gaps—you can add more moss pieces to fill them.
Start wrapping string around the moss ball. Work in different directions—vertical, horizontal, diagonal—creating a web pattern that holds the moss securely. I use cotton string because it’s natural and breaks down over time as the moss attaches to the soil ball. Fishing line works too and is invisible, but it never degrades.
Tie off your string and trim the excess. Your kokedama is ready.
The first time I made one, I didn’t use enough string. The moss shifted and exposed the soil within days. Now I wrap until the string pattern is dense enough that I can barely see the moss between the lines. After a few months, the moss grows and fills in, and the string becomes less visible.
Watering and Moisture Management
Watering kokedama is different from watering potted plants. The moss dries out faster than soil in a pot, and you can’t just pour water on top and expect it to soak through evenly.
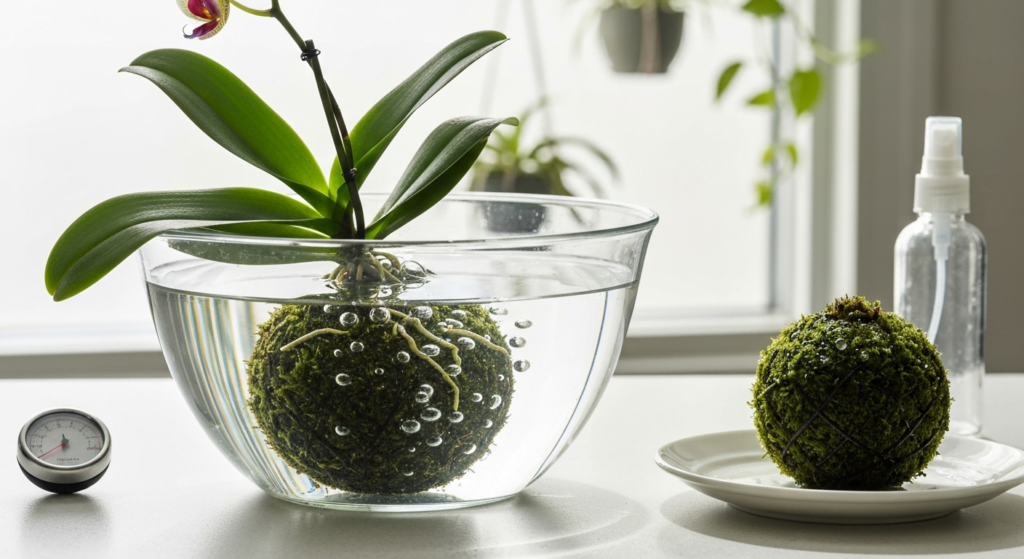
The Soaking Method
Fill a bowl or bucket with room-temperature water. Submerge your kokedama completely and let it soak for 10-15 minutes. You’ll see air bubbles rise as water replaces the air pockets in the soil and moss.
When the bubbles stop, lift the kokedama out and let excess water drain for a few minutes. The moss ball should feel heavy and saturated but not dripping.
I do this every 3-5 days in summer, every 7-10 days in winter. The schedule changes based on temperature, humidity, and how fast your specific plant drinks water.
Checking Moisture Levels
You can tell when kokedama needs water by weight. A dry moss ball feels light. A properly watered one feels noticeably heavier.
The moss also changes color. When it’s wet, it looks dark green. As it dries, it fades to a lighter, yellowish-green. If it turns brown, you’ve let it get too dry too many times, and the moss is dying.
I keep a moisture meter handy for checking the soil inside the moss ball. I poke it through the moss into the soil core. For flowering plants, I water when the meter reads “3” or “dry” (on a scale of 1-10).
Humidity Considerations
Kokedama naturally increases humidity around the plant because the moss evaporates moisture into the air. This is great for humidity-loving plants but can cause issues in very dry environments.
If your home is dry (below 40% humidity), consider grouping multiple kokedama together or placing a small humidifier nearby. I hang my kokedama above a tray of water with pebbles in it. The evaporating water creates a humid microclimate without making the moss ball soggy.
Display Methods for Kokedama
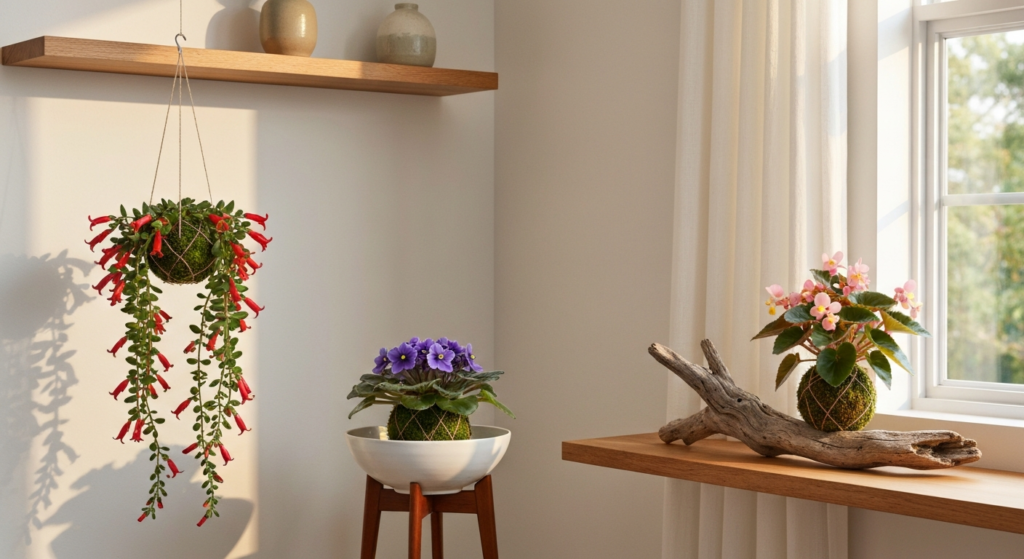
The display is half the appeal of kokedama. Unlike regular potted plants, you have creative freedom to hang, suspend, or arrange moss balls in unique ways.
Hanging Displays
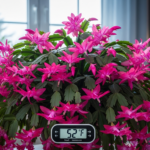
The traditional method is hanging kokedama from the ceiling or a wall bracket. You can tie fishing line or thin wire to the string around the moss ball and create a loop for hanging.
I hang mine at different heights in front of a window. The varying levels create visual interest, and all the plants get good light. When the African violets bloom, it looks like floating purple clouds.
Make sure your hanging point is secure. A water-saturated kokedama weighs more than you’d expect. I use ceiling hooks rated for at least 10 pounds, even though my moss balls only weigh 2-3 pounds when wet.
Resting Displays
You don’t have to hang kokedama. They sit beautifully in shallow bowls, on pieces of driftwood, or in decorative plates.
I have a lipstick plant kokedama that rests on a piece of weathered wood. The trailing stems cascade over the edges, and the red flowers pop against the gray wood. It sits on my coffee table and gets more compliments than any other plant I own.
When displaying kokedama on surfaces, use a waterproof tray or plate underneath to catch any drips after watering. I learned this the hard way when water stained my wooden shelf.
Grouping and Arrangements
Multiple kokedama displayed together creates a stronger impact than one alone. You can hang them in clusters, arrange them at different heights, or line them up on a shelf.
I created a living wall by hanging seven kokedama of varying sizes on a section of my kitchen wall. The different plants—orchids, begonias, and African violets—bloom at different times, so there’s always something flowering.
Display Methods Comparison
| Display Type | Pros | Cons | Best For |
|---|---|---|---|
| Ceiling hanging | Space-saving, eye-catching, good air circulation | Needs secure mounting, harder to water | Trailing plants, orchids |
| Wall-mounted | Decorative, creates living art, accessible | Requires wall hooks, limited space | Compact flowering plants |
| Bowl/plate | Easy watering, stable, moveable | Takes surface space, less dramatic | Begonias, African violets |
| Driftwood | Natural look, sculptural, unique | Needs flat wood piece, can tip | Trailing plants, small specimens |
| Grouped cluster | High visual impact, microclimate | Needs more space, complex watering | Mixed varieties |
Preventing Moss from Turning Brown
Brown moss is the most common kokedama problem I see. The moss dies, turns crispy, and the whole ball starts looking sad. This usually happens from inconsistent watering or environmental stress.
Why Moss Dies
Sheet moss is alive when fresh, but preserved moss (which many craft stores sell) is already dead and dyed green. If you use preserved moss, it will eventually fade to brown no matter what you do. This is normal and doesn’t hurt the plant, but it looks less attractive.
Live moss turns brown from drying out completely. Each time the moss dries to the point of crispiness, more of it dies. After several cycles, you end up with a brown ball instead of a green one.
Keeping Moss Healthy
Use live sheet moss when possible. You can buy it from bonsai suppliers or sometimes garden centers. Live moss stays green and even grows if conditions are right.
Water before the moss gets crispy dry. The goal is to keep it in a cycle of moist-to-slightly-dry, never bone-dry. I check my kokedama every 2-3 days by touch and weight.
Mist the outside of the moss ball between soakings. This doesn’t replace proper watering, but it keeps the moss itself hydrated. I use a spray bottle with plain water and mist until the moss looks wet.
Avoid direct sunlight on the moss. Strong sun dries out the moss faster than the plant can use water, causing brown patches. If you’re growing sun-loving flowering plants like kalanchoe, position the moss ball so the plant gets sun but the moss stays in partial shade.
Reviving Brown Moss
If your moss has turned partially brown, you can replace it. Unwrap the string, peel off the old moss, and wrap fresh moss over the soil ball. Rewrap with new string.
I’ve revived several kokedama this way. It takes 20 minutes and makes the moss ball look new again. The plant doesn’t care what the moss looks like—it only matters that the root ball stays properly moistened.
Some people paint brown moss with green moss paint or spray paint. I don’t recommend this. It’s purely cosmetic and can actually seal the moss, reducing airflow to the roots.
When and How to Remake Kokedama
Kokedama isn’t permanent. Eventually, roots outgrow the moss ball, the soil depletes, or the whole thing falls apart. Most kokedama need remaking every 1-2 years, depending on the plant’s growth rate.
Signs It’s Time to Remake
Roots poking out through the moss are the clearest sign. When you see white or brown root tips emerging through the moss covering, the root ball has filled the available space.
The plant stops growing or flowering despite good care. This suggests root-bound conditions or depleted soil. Flowering plants especially need nutrients to bloom, and kokedama soil runs out of nutrition faster than pot soil because there’s less of it.
The moss ball loses its shape and becomes lopsided or saggy. This happens when the soil mix breaks down and stops holding together. The ball flattens, and the plant tilts to one side.
Remaking Process
The process is nearly identical to making a new kokedama, except you start with an established plant instead of one from a pot.
Unwrap the string and peel off the moss. Don’t worry about being gentle with the moss—you’ll replace it anyway. What matters is being careful with the plant.
Gently pull apart the old soil ball and remove about half the old soil and dead roots. Trim any roots that circle around themselves or look brown and mushy. Healthy roots are white or light tan and firm.
Make a fresh soil ball using the same mix as before (soil, peat moss, clay). Place the plant’s trimmed root ball in the center and wrap new moss around it. Secure with fresh string.
I remake my kokedama in spring, right before the growing season starts. This gives plants time to adjust and put out new growth in their new moss balls. I’ve remade kokedama at other times of year without problems, but spring seems to work best.
Troubleshooting Common Problems
Even with good care, things go wrong. Here’s what I’ve dealt with and how I fixed it.
Moss Ball Falls Apart
This happens when you don’t use enough string or when the soil mix is too loose. The fix is more string and better soil consistency.
If your moss ball is falling apart actively, remake it immediately. Trying to patch it rarely works. Unwrap everything, add more clay to your soil mix to make it stickier, and rewrap with double the string you used before.
Plant Stops Flowering
Flowering plants need nutrients. Kokedama soil depletes faster than pot soil because there’s less volume. I fertilize my flowering kokedama every 2-3 weeks during the growing season.
Use a diluted liquid fertilizer (half the recommended strength) and add it to your soaking water. The moss ball will absorb the fertilizer along with the water.
Too little light also stops flowering. If your plant had blooms when you first made the kokedama but stopped later, try moving it closer to a window or under a grow light.
Root Rot
Root rot in kokedama is less common than in pots, but it happens when you water too frequently or the soil mix stays soggy.
If your plant’s leaves turn yellow and mushy from the base up, check the roots. Unwrap the moss ball and look for black, slimy roots with a rotten smell. Healthy roots are firm and light-colored.
Cut away all rotted roots with clean scissors. Replace the soil mix completely—don’t reuse any of the old soil. Make a new kokedama with a lighter, faster-draining soil mix (add more bonsai soil, less peat moss). Water less frequently.
Pests
Spider mites, mealybugs, and aphids can all affect kokedama plants. The treatment is the same as for potted plants—spray with insecticidal soap or neem oil.
The trick with kokedama is avoiding the moss. When I spray for pests, I cover the moss ball with a plastic bag, leaving just the plant exposed. This protects the moss from the spray, which can discolor or damage it.
Troubleshooting Quick Reference
| Problem | Likely Cause | Solution | Prevention |
|---|---|---|---|
| Brown moss | Inconsistent watering, sun exposure | Replace moss, improve watering routine | Use live moss, mist regularly, avoid direct sun on moss |
| Ball falls apart | Insufficient string, loose soil mix | Remake with more clay, tighter string wrapping | Test soil consistency before wrapping, use generous string |
| No flowers | Nutrient depletion, insufficient light | Fertilize regularly, increase light | Feed every 2-3 weeks during growing season |
| Yellow leaves | Overwatering, root rot | Check roots, reduce watering frequency | Let moss dry slightly between soakings |
| Wilting despite wet moss | Root rot, cold damage | Inspect roots, improve drainage | Ensure proper air circulation, avoid cold drafts |
Seasonal Care Adjustments
Kokedama care changes with the seasons. In my experience, understanding these shifts prevents most problems.
Spring and Summer
These are active growth months. Your flowering plants will need more water, more fertilizer, and more attention.
I water my kokedama every 3-4 days in summer versus weekly in winter. The combination of heat, longer days, and active growth means plants drink faster and the moss dries quicker.
Fertilize every 2 weeks during this period. Flowering takes energy, and your plants need nutrients to support blooms.
Watch for increased pest activity. Bugs love warm weather and new growth. I inspect my kokedama weekly in summer for any signs of spider mites or aphids.
Fall and Winter
Growth slows, and so does water consumption. Cut back on both watering frequency and fertilizer.
I water every 7-10 days in winter. The moss stays damp longer because plants aren’t drinking as much and humidity is often higher indoors during heating season.
Many flowering plants take a rest period in winter. African violets might bloom less, begonias often stop flowering completely, and orchids enter dormancy after blooming. This is normal. Reduce fertilizer to once a month or stop completely.
Light becomes challenging in winter. Days are shorter, and sun angles change. I move my kokedama closer to windows or supplement with grow lights to maintain flowering.
Frequently Asked Questions
How long does a kokedama last before it needs to be remade?
Most kokedama need remaking every 12-18 months. Fast-growing plants might need it sooner, while slow growers like orchids can go two years. Watch for roots growing through the moss or the plant stopping its growth and flowering—these are clear signs it’s time to remake. The moss itself can last longer if you use live moss and keep it healthy.
Can I use regular potting soil for kokedama?
Regular potting soil is too loose and won’t hold together in a ball shape. You need to mix it with something sticky like clay powder. I use about 70% potting soil mixed with 20% peat moss and 10% clay. This creates a mixture that holds its shape when wet but still drains well enough for healthy roots.
Why is my flowering plant blooming less in kokedama than it did in a pot?
This usually means either insufficient nutrients or not enough light. Kokedama soil is limited in volume, so nutrients deplete faster. Start fertilizing every 2-3 weeks with diluted liquid fertilizer. Also, check your light levels—many flowering plants need bright indirect light to bloom consistently. If you’ve recently made the kokedama, give your plant a month to adjust before worrying.
What’s the difference between preserved moss and live moss for kokedama?
Live moss stays green and can even grow if conditions are right. It requires more careful watering to keep it alive. Preserved moss is dead moss that’s been dyed green—it’s easier to work with and cheaper, but it will eventually fade to brown. Neither type affects the plant’s health (the moss is just decorative covering), but live moss looks better longer. For your first kokedama, preserved moss is fine. Once you’re comfortable with the technique, try live moss.
Conclusion
Kokedama transforms flowering houseplants into living art that hangs in your space like natural ornaments. The moss ball technique isn’t complicated once you understand the basics: compact flowering plants work best, soaking beats surface watering, and live moss needs consistent moisture to stay green.
Start with an African violet or small begonia. These species forgive mistakes and bloom readily in moss balls. Make your first kokedama on a weekend afternoon when you have time to work carefully. Don’t stress about perfection—the moss ball will look a bit rough at first, but it develops character as the plant grows.
The real reward comes three months later when your kokedama blooms for the first time. You’ll see flowers emerging from a ball of moss suspended in mid-air, and you’ll understand why this Japanese technique has lasted for centuries. It’s not just about saving space or following trends—it’s about growing plants in a way that feels more connected to how they grow in nature.
What flowering plant would you choose for your first kokedama? Share your ideas in the comments below—I’d love to hear which species you’re considering and help troubleshoot any concerns before you start.